Passive Solar Home Project
The goal of this project was to create an energy efficient house using passive day-lighting techniques to bring light inside the home. Our group, team SOLution, researched and designed our house over the long course of around 2 months, tweaking and redesigning many features to create the best we could establish. Throughout the process, we also designed a solar water heater, created a day-lighting experiment, tested certain materials for heat capacities, and designed two wind turbines.
Solar Water Heater
This mini project was derived from the unit of heat capacities and thermodynamics. The goal was to create and design a smaller version of a potential real-life solar water heater. Our group decided to use thick copper tubing; to heat the water, a plastic juice bottle; to hold the water, plastic tubing; to replace the lack of more tubing, a cardboard box wrapped in tinfoil; to hold the copper tubing while heating it with the suns rays, and a paper bag with inserted tissue paper; for needs of insulation. Our design didn't go as well as planned, but it did heat up the water a whopping 5 degrees Celsius. The techniques for heating included bending the copper tubing like a snake in the box to absorb the most sun, as well as, spray painting the inside of the box black to attract more heat, yet we ran out of black spray paint.
The Day-lighting Experiment
Day-lighting is the use of, in our case, using the sun to light and heat the inside of our house. Learning about the many techniques, we used a few common ones known as clerestory windows, light shelves, solar tubes, regular windows, and a skylight. The objective was to get as much sunlight into each of the rooms possible. After we built it out of cardboard, we tested the average sunlight using a light bulb with all of the lights off to see how well our model took in the sun. To make this as close to reality we found the angles at which the sun rises and then falls in the summer and winter. Winter being at a lower angle meaning we need more horizontal sunlight for more warmth, and summer being at a much higher angle meaning less sunlight to keep the house cool. In conclusion of our experiment we saw that the solar tubes and skylight on the top didn't get much sun at all due to the angle of the sun, explaining why a flat roof is not part of our current passive solar design.
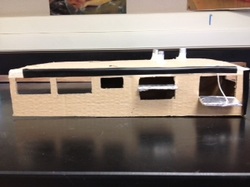
This view of the day-lighting model shows the two clerestory windows on the left, window in the middle, a window with a light shelf, and a window with a reflector.
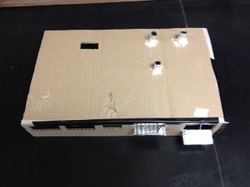
From the bird's eye view you can see the flat roof of our model, showing the three solar tubes, and the skylight to the left of the solar tubes.
Site Selection
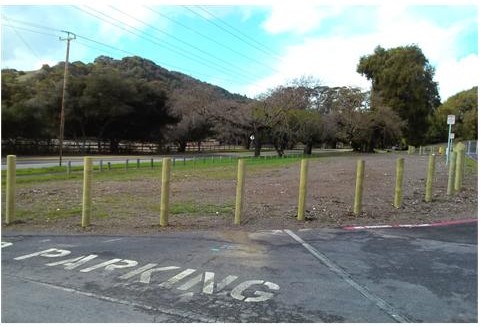
This part of our project was directed towards the importance of our home's location on campus. This was a big deal regarding how much sunlight gets in in the morning and afternoon. So during one day in class each group roamed the campus in search of the best site, they thought, would settle their designs. Narrowing the choices down, we took into account it's visibility to community, sunlight intake, demonstrating concepts, accessibility to students, foundation, view, noise, proximity to campus, wind, and it's purpose. Our first site was near the basketball courts near the football field, next was on/close to Novato Blvd, and our last site was in middle campus. The site we ended up choosing was next to Novato blvd. for many reasons behind day-lighting and its visibility.
Materials Experiment
Every group had a different job in the task of answering: What materials are we going to use in our actual building? We designed this experiment because we wanted to know which materials are best for absorbing/reflecting heat, how long do they hold that heat, and how quickly they'd heat up. So, during our procedure our group dealt with the insulation testing. To test our insulation we took a cup of water heated to a certain degree, measured and recorded that temperature and then wrapped it with the insulation seeing how long each material could hold the heat most. We used thermometers and timers to carry out the experiment. We tested fiberglass batting, spray foam, Styrofoam, jeans (yes, blue jeans), and then no insulation. Our results claimed that the best two overall were fiberglass batting and spray foam. Below shows the graph of the data recorded.
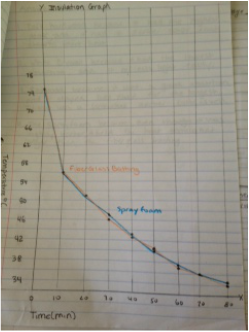
It may be a little hard to see, but this is our fiberglass batting vs. spray foam graph, showing the slight differences in keeping the heat in the longest. The winner in the long run was spray foam but the problem is its cost compared to fiberglass batting. So, looking back on this, we chose fiberglass batting over the spray foam.
Wind Turbines
There are two types of turbines, HAWT (Horizontal-axis wind turbines) and VAWT (Vertical-axis wind turbines). The point of this was to make the most efficient wind turbine for a house. This experiment was solely designed and used for model turbines made of paper, cardboard, etc. After a group had prepared their turbine, they brought it over to the station to test it by turning on a low-power fan in front of the turbine. This was recorded by the readings the device recorded attached to the turbine created. There were two speeds demonstrating low levels of wind and high levels of wind. The low and medium speeds were written down on our data table that gave us an average of 1.56 on low speed, and 1.96 on medium for the HAWT. Unfortunately our VAWT was not made in time of our deadline (That actually worked). We really struggled with the VAWT, mainly probably because we focused too much time on our dynamics of our HAWT, not knowing how to make one successfully.
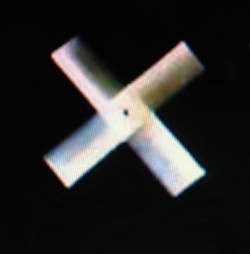
This is a picture of our HAWT design. We focused mainly on simplicity and making it as lightweight as possible. Building this we used only manilla folder paper and cut four rectangles and taped them together. Then we made a small hole at the center and tested it. To our surprise we got a fantastic speed on the medium speed from our fan with a high measurement of 2.2 voltage.
Building Design
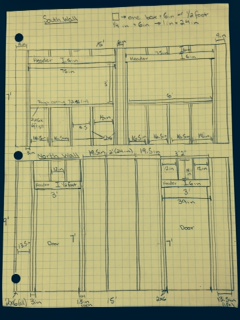
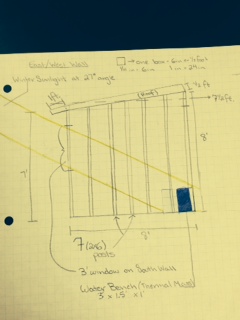
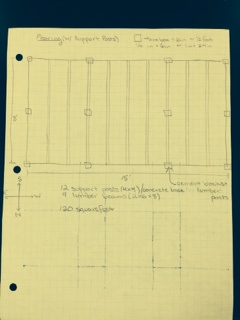
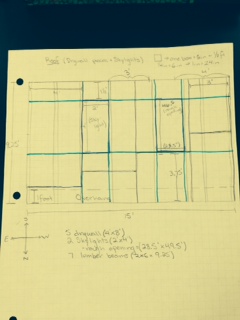
These are the blueprints we drew to scale of our building. It shows the North, South, East, and West walls. As well as the roof and flooring/foundation. While making these we had to consider many things, from the number of wood planks to the complexity of window frames. The North wall (The 8 foot tall wall) has two doors and no windows due to the fact that the north side wouldn't get any direct sunlight. The South wall (7 feet high) with 2 large windows, draws all of the morning sun to heat the house with using its insulation to hold the heat it throughout the day. The East and West wall (8 feet wide) shows the slant of the roof, enabling water and runoff to slide off. Also the slant provides an overhang that prevents the summer sun from entering high above the house, still allowing the winter sun in too. The roof is made out of a highly reflective material, repelling the suns rays from penetrating during the summer. Our foundation is made up of 12 cement support beams and 9 limber beams keeping the building portable yet stable. As a neat addition to our house we designed a solar water bench, using the high specific heat of water to hold in even more heat from the sun as seen in the top right picture above. The estimated total cost of our building concluded to a total cost of $4'010.60, saving about $1'000 off our original budget of $5'000
Power Point Presentation
Our Model
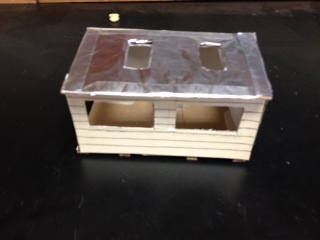
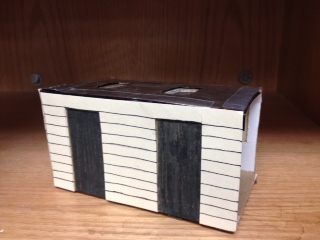
In addition to drawing the blueprints, we also had to create a small scale model of our design. The goal was to make it as neat and nearly realistic to the actual blueprints. We made the skeleton of the building out of thin cardboard and then glued white paper to the outside and inside walls with a drawn wood-siding design to make it look like it was the real thing. Then we cut out the windows and put tinfoil on the roof to demonstrate the reflective material. Not only did we make a model of the house but we made a model of the water bench placed inside of the home. Made out of tape, it was a cool feature to our model, as seen in the second picture below.

Justification
Physics Concepts Covered
1. Conduction - The energy transfer of heat from particle to particle within certain materials, or from one material to another when the two are in direct contact.
2. Convection - A means of heat transfer by movement of the heated substance itself, such as by currents in a fluid.
3. Radiation - Energy transmitted by electromagnetic waves.
4. Heat - Energy transfer via random molecular motions, resulting in gain or loss of internal energy.
5. Temperature - The property of material that tells how warm or cold it is relative to it is relative to some standard.
6. Specific Heat Capacity - The quantity of heat required to raise the temperature of a unit mass of a substance by one degree Celsius.
7. First Law of Thermodynamics - Heat added to a system is transformed to an equal amount of some other form of energy.
8. Second Law of Thermodynamics - Heat will never of itself flow from one object to another of higher temperature.
9. Third Law of Thermodynamics - Temperature can never get to zero, it always exists.
Reflection
I have to say coming into it, I thought this project was going to be really difficult, but now looking back it was challenging yet inspiring. This was by far the most complicated project we've done so far, and we are this time we are actually going to build one house based off of the best design presented on the presentation night. So putting this into action means us taking shifts to make the house with our own hands, and of course contractors and architects who do this for a living. At a point in time we will have built the house chosen by weekend community service shifts a student will be volunteering to. I think this is a great way to promote our school in a variety of ways.
I think the work ethic in our group wasn't as balanced until the end of the project. Some people did more than others, but that's just how it goes sometimes. I felt like at the beginning we weren't much of a group, we all wanted to go our own ways. Towards the end we really came together as a group and it made it a lot more enjoyable. We put together our creative thinking and put it to our advantage. I think one thing i could've done better was to do more research on the subject before doing something, and one thing i did well was staying on task. One thing i learned was that was that water has a high specific heat, and that is why we boil our food in water, to convect heat. In all, I think this was a huge step for STEM and San Marin.
I think the work ethic in our group wasn't as balanced until the end of the project. Some people did more than others, but that's just how it goes sometimes. I felt like at the beginning we weren't much of a group, we all wanted to go our own ways. Towards the end we really came together as a group and it made it a lot more enjoyable. We put together our creative thinking and put it to our advantage. I think one thing i could've done better was to do more research on the subject before doing something, and one thing i did well was staying on task. One thing i learned was that was that water has a high specific heat, and that is why we boil our food in water, to convect heat. In all, I think this was a huge step for STEM and San Marin.
