The Rube Goldberg Machine
Many of videos like this, inspired us to make one of our own this year
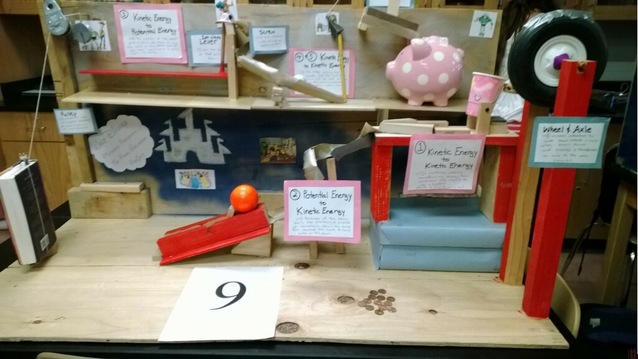
Below is our final Rube Goldberg Machine we made over the course of 4 weeks
Our project history
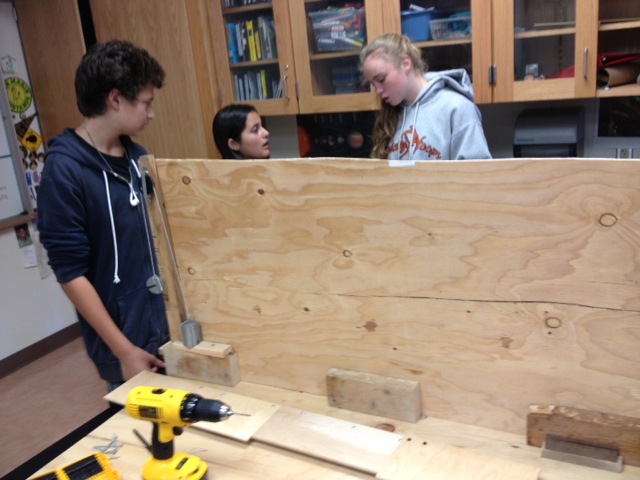
The point of our Rube Goldberg project was to make a simple task as complicated as possible. Our task was to put a penny in a piggy bank. Part of the project was to include at least 5 simple machines, 10 steps, and 4 energy transfers. When we started construction, we had to build the base. At first it didn't look like much but we added a lot more steps as the project progressed. It started as just as this below.
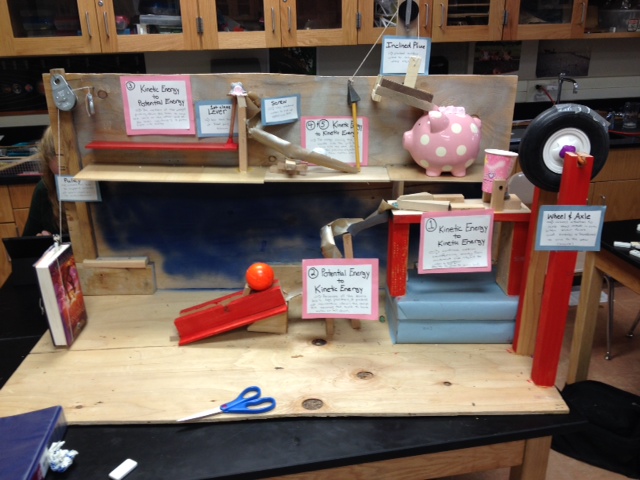
As you can see under, it changed a lot. We made all of our steps including our 2 pulleys, 2 inclined planes, 2 screws, 1 lever, and 1 wheel and axle. Also, we made our 2 pulleys by using string and the wheel and axles provided in class. Our 2 inclined planes were made of wood as well as the lever. The 2 screws were made out of cardboard wrapping paper rolls. Lastly, the wheel and axle we made out of a rubber wheel, tinker toy parts, and two wood posts. We added a little paint to some of our wood planks too.

Here, we did more painting and decoration. we spray painted the back blue and the top back silver. We also switched the tennis ball with an orange foam ball with more mass to hit over the book which was a big hardship with one of our steps.
What I did for the project-
At the beginning i helped put the base together and connect all the wood supports ad shelf. Also I brought the cardboard tubing and created the idea for the screw. As well, i made the pulleys many times after them breaking for unknown reasons and to insufficient balances of the weights on each side. I made the last step of the machine where the penny rolls down the incline plane into the piggy bank which required the knowledge of using a saw, drill, and a hammer. At the end of our design i drew the schematic sketch of our final product. Out of all, everyone contributed greatly to the project whether it was gluing, taping, cutting, everyone did their part. It was definitely a fun experience.
At the beginning i helped put the base together and connect all the wood supports ad shelf. Also I brought the cardboard tubing and created the idea for the screw. As well, i made the pulleys many times after them breaking for unknown reasons and to insufficient balances of the weights on each side. I made the last step of the machine where the penny rolls down the incline plane into the piggy bank which required the knowledge of using a saw, drill, and a hammer. At the end of our design i drew the schematic sketch of our final product. Out of all, everyone contributed greatly to the project whether it was gluing, taping, cutting, everyone did their part. It was definitely a fun experience.
Concepts covered
Physics/engineering concepts-
One of our basics concepts was force. Force, mass times acceleration, had to do with almost all of our Rube Goldberg machine's steps. Especially our knocking over of the book step, or the 4th step, it took a long time to fix the problem acquiring why we couldn't get enough force to knock over the book.
Our project had a lot of examples of a concept called work, which is force times distance. Work was used in our pulley for instance when the book topples over, it releases the weight on the other side of the pulley to press on the lever and exerts a certain amount of joules from where the distance it falls to the target times the force the load/weight has.
Acceleration was also involved in a few major steps. One, being the most important step, getting the penny in the piggy bank. If the penny had to much acceleration due to gravity and the inclined plane it would miss the piggy's slot for coins. But even if it did we made a wall of clay for which the coin would go in more likely if missed. The factors of acceleration pertained to the screws, mainly the second one on the shelf.
Another concept covered was velocity. For instance, to find momentum you have to find is velocity first. Velocity is the change of acceleration divided by its time taken. This can be shown from some of our steps like the marbles going down the screws.
A factor used in our project that applied greatly was momentum, the mass of an object multiplied by its velocity. In both of the screws we relied on the momentum of the marbles to increase and cause them to knock down the object known to be brought down.
Mechanical advantage pertained to all the simple machines use in our project. Whether it was the lever, wheel and axle, inclined plane, screw, or pulley it helped us calculate the math of each step. It also gave us the knowledge of how much each simple machine did compared to something not of advantageous.
A small concept our group covered was toppling for a few of our steps, one being the release of the orange foam ball which is being held up by a jenga block. To let the ball go, the marbles have to create enough force to topple the jenga.
There is a few kinetic and potential transfers throughout our machine's working and affects how the energy is being used and moved around. In the second to last step, where the marble hits the golf ball, it is a kinetic to kinetic energy transfer because the marble is already in motion which hits the golf ball that turns into kinetic energy after being hit.
Non physics/engineering concepts-
An area not including physics is the math course, Algebra 2. For many of the physics problem calculations we needed to know basic algebra to solve each equation.
For the end of our design we included our art and design skills, applying them to the project to make it more professional and presentable.
Reflections
Positives-
I think the project went very well overall. One thing I learned about myself is that I can saw wood pretty well. i carved the whole last step out of different pieces of wood. Secondly, I think i did a good job presenting at the presentation. I thought it would be really nerve-racking but it turned out to be just fine.
Negatives-
One thing I could of done better was to not get off-track or pay attention more to the project itself. For example, not going to other groups or talking with neighbor groups. A thing I could improve is my work with drills and screwing nails into wood or other materials. i couldn't get the hang of drilling during our basic construction.
